The put-in is on the northwest side of Timberline Road right along the Poudre River Trail. There is one dam you have to portage just south of the crossing at east Prospect Road. To get around the dam, pull out just above it on the left hand side of the river and drag around. The second place you have to get out of your boat is at the top of the Environmental Learning Center (ELC) just past the broken dam near the water treatment plant. The rest of the run is free flowing and an easy paddle. You'll know it's time to get out when you cross under the railroad bridge (take the far right trestle opening) and see the burned out remains of the Old Strauss Cabin on your right about a half mile down stream from the bridge.
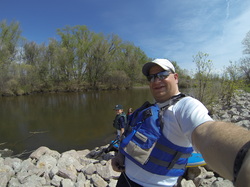
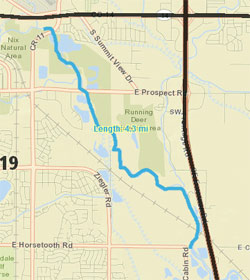
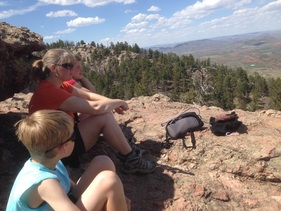
A few weeks ago the kids and I capped off a weekend of outdoor activities by doing "The Town Run" (or at least our variation of it) on the Poudre River. We enjoy paddling a 4.5 mile stretch of the river from Timberline just south of Mulberry down to Strauss Cabin Road not to far from our house. We each have our own modes of river transport including Megan in her rodeo kayak, Lucas on his sit on top kayak, and me on my inflatable SHUBU SUP. Below are some highlights form our trip. We had hoped for a little more water on this run but they must have been taking water out upstream. The day before the water was double this volume but that's paddling in a heavily irrigated river way. This level (about 450 CFS) is about as low as you want to paddle on the Poudre River, otherwise you end up walking a lot. Getting there
The put-in is on the northwest side of Timberline Road right along the Poudre River Trail. There is one dam you have to portage just south of the crossing at east Prospect Road. To get around the dam, pull out just above it on the left hand side of the river and drag around. The second place you have to get out of your boat is at the top of the Environmental Learning Center (ELC) just past the broken dam near the water treatment plant. The rest of the run is free flowing and an easy paddle. You'll know it's time to get out when you cross under the railroad bridge (take the far right trestle opening) and see the burned out remains of the Old Strauss Cabin on your right about a half mile down stream from the bridge.
0 Comments
On Saturday the 3rd of May we decided to head up to Lory State Park as a family. The goal was to begin our challenge to slowly work off the multiple steep trails and hikes that will be required to check this park off the list. I have done a bit of turkey hunting on these hills and those days never disappoint, as long as you are into a hike that makes you feel like your legs and lungs are going to give out. It's steep, hot, and extremely beautiful. Lory is probably one of my most favored places on the Northern Front Range because of the variety of trails and the access to the lake. The park is situated on the West side of Horsetooth Reservoir and butts up against forest service and private land to the west, and Horsetooth Mountain Park to the south. The trail we hiked was up to the top of Arthur's Rock which is a 3.4 mile round trip. Its a steep, dusty, and rock strewn trail that works its way back and forth across a creek filled ravine from the valley to the top of the ridge line. It's not quite the tallest peak in the park but it's very close. Generally we see a lot of wildlife but on this day it was mainly birds soaring on the thermals. However, a couple we met on the way up said they saw a mama bear and two cubs about half way to the top that morning. It's not surprising as these hills are full of mule deer, bear, mountain lion, and of course turkeys. Headed up the trail Headed down to find some cold Cherry Limeaid On a recent camping trip with our friends the Lee’s, I had the opportunity to introduce their family to fun sport of archery and both of us dads shared our love of BB guns with all the kids. Archery and other shooting sports teach great hand eye coordination, body control, and personal achievement. Additionally, when you are teaching a group of young kids, they also get to brush up on important life skills like patience, safety, and how to encourage each other through a new challenge. The kids had such a good time shooting that before we knew it we’d be slinging arrows and shooting BBs for an entire afternoon. Because we have been shooting as a family for several years now we have a collected a nice variety of bows and arrows that cover the needs of the youngest beginner archer, all the way up to a high-powered compound bow for the more accomplished shooter. In between these extremes we have two additional bows that fill in different ranges of draw weights and lengths for the progressing shooter. It was fun to work with each of the kids to help instruct them on good posture, safe shooting technique, and to watch them enjoy the success of hitting one of several targets we brought along. A minimal setup is easy and cheap Getting into archery with a family doesn’t really take a lot of expensive gear, time, or learning some complicated techniques. Best of all a family can outfit themselves with one or two bows, a quiver of arrows, and a target for less than $150. Here are my suggestions for a quality beginning setup that will provide hours of enjoyment while out camping or in your backyard.
The basics PSE Silver Snake Recurve Bow, ~$55.00 at Gannett Ridge Hunting 22 pound draw weight and is 60 inches tip-to-tip This bow is a very basic setup, easy enough for anyone to shoot, and is perfect for either right or left hand shooters. And even though the length is petty tall for a small shooter, the lightweight material makes it a good first bow for even a young children. This simple bow can be found at most archery stores including a local shop like Gannett Ridge Hunting (in Fort Collins) or a big box outdoor store like Bass Pro, Cabela’s, or Sportsman’s Warehouse. We like to support our local archery store and so we buy as much as we can from them. Additionally, a local shop will probably provide a little free shooting advice for your young shooter when they purchase their bow so you don’t have to be the expert. Besides, you’re not going to get that kind of advice at every Walmart across America, however, our Walmart does happen to be staffed by some really helpful hunters who are more than willing to answer questions, give advice, or help you out with your options. This type of bow is known as a recurve because the tips at each end bend back towards the front of the bow, increasing the potential power that it can store up when the string is pulled back tightly. When you are shopping you’ll come across “kids bows” that might look cooler or that are compound bows but be leery, these bows tend to be heavy, not terribly accurate to shoot, more expensive, and don’t aid in helping learn the basics of good technique. Kids don’t need the bells and whistles to learn how to control their shots and find success. A bow like this also does not have built-in sights to aid in aiming the arrow and so your young archer will learn how to shoot instinctively and will become better sportsman for leaning in this traditional manner. Later on if they progress to a competition or compound bow they can learn how to shoot with the aid of mechanical sights that are calibrated for shooting targets at specific distances. Overall, the PSE bow will also be a good investment because the younger kids will be able to use it for a long time and as they progress it will become your “go-to” teaching bow for introducing others. It also has enough power that an adult can have fun shooting it as well.
Allen Carbon Arrows, $3.50/arrow at Walmart Now you can spend a lot on arrows (anywhere from $8 - $16/arrow) but for family target shooting I always look for the lightest, cheapest, and fully assembled options to ensure shooting is enjoyable and low cost. You want to look for arrows that are made of carbon and weigh around 10 grams and are sized at a length between 26 and 31-inches. Don’t buy plastic or composite arrows, even if they claim to last a long time, because they won’t be any fun to shoot. A poorly shooting arrows will only lead to disinterest because the kids won’t be able to fling them as far, or as fast, as a decent carbon option. A nice light arrow will travel flatter for longer distances and will help your young archers (of any age) have quick success with sticking their arrows down range. Also ensure that you are buying completely assembled arrows because boxed packages that you find at Cabela’s or other stores often don’t have flights attached (these are the feather like plastic veins at the back of the arrow), point holders installed at the “business end”, or that have even been cut to the correct length. One word of advice is to look at the purchase of arrows as no different than buying golf balls or cheap kites, they are going to get lost and broken so just buy a bunch and keep picking up a few every time you’re in the store. It also helps to choose a shooting area free of rocks and other hard objects, so that when arrows miss their intended targets, they fall back to the earth softly and last a bit longer. Additionally, when you buy arrows at Walmart (or most stores) you will need to buy points to screw into the “business end” of the arrow. Simple field points are cheap, like a few bucks, come in packs of 10 or so, and simply screw into the point holder. Field points come in blunt bullet looking shapes (slightly safer) or a more pointed shape that tend to stick into targets easier. Since my kids have a bit more experience, and I always supervise shooting, I generally buy the thinner, sharper field point because they tend to stick into targets with less velocity behind them, this can be really good for young archers. However, If you have kids that are prone to not listening or can’t seem to watch for others walking into their shooting lane, a more blunt tip may be a better option. Or better yet, don’t let them shoot until they are grown up enough to take direction from an adult well. Foam or bag type target, $25-$50 The last element of required equipment is your target. There are a lot of inexpensive options on the market, and for young archers, I would select a light weight and larger sized target that is easy to get an arrow into. As you are learning, especially with young children, they won’t be confident or strong enough to sling an arrow towards the target with much velocity and so a softer foam or hay-type target is more desirable. If they are finding success getting their arrows to stick it will help build confidence and strength. However, don’t go to large with your target because you might want to be able to stick it into a car for transport to an open field or park. Another consideration is a plastic mesh bag but be aware that the first 50 or so arrows you put into it will take a little bit more power because the surface of the bag is pretty tight and arrows need some speed to get through. However, the more you shoot at a target like this the more they soften up and they’ll generally last longer than a foam target. Optional stuffArm protection, $10-$25 One thing to keep in mind when you are shooting is that the bow string is going to be passing by your forearm at a high rate of speed. And when you are new to shooting you’ll often get your forearm in the way causing a skin burn or even some bruising. Correct handling of the bow can be a painful technique to learn but you can eliminate this pain by wearing a thick sweater or better yet buying a simple arm guard. All arm guards do the same thing but range in cost based on the materials used and the quality of the gear. We have had good luck with inexpensive plastic arm bands for the kids and leather sleeves for the stronger shooting bows. Once an archer learns good technique you don’t hit your forearm too often, but it still happens from time to time, and at higher draw weights can be very painful. Finger gloves, $15-$25 Another really good buy for your beginning archer is to get them a nice three finger glove. This simple glove basically puts leather covers over the fingertips of the shooting hand that they are using to pull the string back, immediately allowing them to pull back harder on the bow, without their fingers feeling pinched or strained by the thin bow string. Make sure to pay attention to the current size of your children’s fingers and don’t worry about buy them to grow into the gear, buy what you need in the right size from the start. 3D targets – Start at $100 3D targets come in many shapes and sizes including game animals like deer, elk, turkey’s, or pigs and you can even find them in the shapes of bleeding zombies and a variety of dinosaurs these days, as well. These targets are really fun once your archer begins to gain confidence, they will aid in the improvement of targeting skills, and keeps them engaged longer because of the higher level of difficulty. Because these targets are shaped like an animal, it requires the archer to aim more carefully than they might with a large foam target. I enjoy using a small buck deer target because it forces me to practice aiming at a very small portion of the chest area so I am able to take a very ethical shot when I get into the field. When preparing to shoot real animals it’s best to aim small so you miss small. Additionally, 3D targets are harder to hit by design and so you will find many more arrows flying behind your intended destination. When using 3D targets you should always shoot into a large backstop area, free of obstacles, and full of grass or straw bales. Don't forget the classic Daisy Red Rider - $30 at Walmart And when your fingers get tired of flinging arrows you should always have a few classic BB-Guns laying around, and we don't look any further than the Classic Red Rider by Daisy. This is a lever action air pump gun that is great for kids and beer can shooting dads. It propels BBs at 350 feet per second and can shoot up to 195 yards. The best part is that is holds over 650 BBs at a time so you'll run out of your cold beverage before you have to reload, which is good because your last can will be all full of holes anyway. If you have a beginning shooter who is looking to hone their marksmen skills, or even a bored dad who is tired of playing in the camp fire, the Daisy Red Ryder BB Gun is a great option to get them started. An afternoon of fun with friends In conclusion, with a bit of common sense instruction and some basic safety discussion with everyone involved, kids and adults can really enjoy the challenge and fun that shooting sports provide. The kids spent two days shooting targets and the only injury we had was a pinched finger and some minor bruising from bow strings hitting forearms on occasion. We're already looking forward to our next trip to the mountains to enjoy an afternoon together.
Wheeler Geologic Area
On our recent vacation to South Fork Colorado we fulfilled a mission we set out upon about 5-years previously. The mission, 4-wheel back 24 miles of jeep road, then hike about a mile into Wheeler Geologic Area. This was no small task and in the end required the rental of 2 4-wheel drive Jeep Rubicons and about 9-hours of round trip travel and hiking. It was amazing, a total blast, and nice to finally see this place we have been itching to experience for so many years. The trek really started on a previous trip to the South Fork area (around 2007) when the entire family, I think 13 of us at the time, decided we’d like to check out this odd outcropping of leftover volcanic matter tucked well into the mountains southeast of Creede. We loaded up two full sized pickup trucks and hoped for the best. The trip was epic and not just in that we failed at our goal. It was epic in the sense of how badly the passengers were banged up and sick by the end of a four hour attempt. The road was nearly impassible with these high clearance vehicles because of the long wheel beds that made the ride just too rough to bear. On that first trip we saw some wildlife, did some mud running, and managed to get out without breaking either of the vehicles or ourselves. However, we have talked about a return trip ever since. Lucas and Cole checking things out. Wheeler Geologic Area sits at 11,040 feet, a nearly 3,000 foot climb from the Rio Grande River that winds through the valley floor. The site itself (about 640 acres in total) is made up of what is called “Volcanic Tuff” and is the remains of the fine debris that was blown sky high from vents deep into the earth. Tuff is debris that goes from dust flakes and granules up to blocks 2-3 feet in size and then compacted together to make a soft rock substance. The area was further compacted by several thousand feet of lava and several thousand more feet of dust and debris during a period of high volcanic activity. What remains after millions of years of erosion from wind and rain is oddly shaped hoodoos, which are large pinnacles and spires. For now, capstones help to hold together most of the vertical cracks and odd shaped formations. However, like most everything in nature, these amazing natural features will eventually erode away into large plains of dusty soil and small rock. From what we read, the San Juan Range of mountains where Wheeler sits, was the largest area of volcanic activity in the state of Colorado. It was named for Captain George Wheeler who was in charge of surveying and exploration work being done by the War Department in 1874. On our successful trip to the monument we had a chance to experience several distinct land types and road conditions. The first phase of the trip was 14-miles in length and was a regular dirt forest access road. This part was a breeze and the Jeep Rubicons made the bumpy dusty roads feel like an asphalt road. We were continually impressed with our vehicles because of how well they performed throughout the day. On the way up we caught a glimpse of a group of bachelor mountain goats out for a morning walk. The second part of the road was another 14-miles in length and was a very different type of experience altogether. From the trail head in a meadow the trail rose quickly and narrowed to a third of its original width and we began to get a sense of what lay ahead. Rocks jutted from the road in all directions and large potholes, filled with muddy water, were everywhere. The interesting part of this long 4-whel drive stretch is that you only gain 200 feet in elevation from the start to end point at the trail head. However, in-between we went up and down steep roads through valleys and rock gardens. In many spots there were long stretches of deep muddy ruts and steep sections so extreme you could almost lean out of the cab and touch the ground with your hand. Munching some lunch Once you reach the 14-mile point the hiking begins. Before we took on this next challenge we stopped to eat some lunch. The kids had fun dodging the camp robber birds and obnoxious little ground squirrels while munching down their PB&J and chips. The main Wheeler Geologic area was just a short 1-mile hike up a steep hillside and everyone was happy to be hiking instead of riding in the jeeps. By this point everyone was feeling the length of the day and the 11,000 altitude and a few of the kids were not feeling real well. Their effort was well rewarded when we reached to top of the knoll and the crazy spires and hoodoos laid out before us. The return trip was pretty much the same as the up but the views were somewhat different. Since we made it through all of the deep mud puddles on the way up we hit them extra hard on the way back down the mountain. On one hole in particular we shot water so high that we soaked the boys sitting in the backseat.
On our first summer vacation of 2013 we returned to spend our second 4th of July in Telluride, one of our favorite mountain towns in Colorado. Telluride is one of those amazingly special places that cater to those who love a mountain setting and who know how to use it to its full advantage. On our last trip we marveled at this beautiful town that is nestled amongst the aspens and red rocks in a tight box canyon sitting at the far southwestern corner of our state. There is literally one way in and out of this little mountain village, and it has an eclectic character all its own. Rising steeply from the valley floor on all sides are a variety of trails and waterfalls that make for challenging but rewarding day hikes. During our trips we have hiked to see two of the areas waterfalls, a 4-mile hike to Bear Creek Falls and a shorter but steeper hike up to see Cornet Falls. Hikes - Cornet Falls and Village Trail One of the truly unique features of the town is there gondola system which traverses three mountains and rises nearly 2,000 feet in elevation from the valley floor to the end point up in Mountain Village. The best part of the gondola is that it is free and everyone uses it to get around town which really saves on traffic congestion and makes for a much more enjoyable ride into town than in a car. The best feature of the gondola is not only that it runs between the Mountain Village and town but you can take your bike along to gain access to 14 amazing hiking and mountain biking trails. On our first trip I had no idea about the gondola and so didn’t know to bring my bike stuff. I didn’t make that mistake on our return trip this summer. On this most recent trip I would get up at dawn before the family was awake and make a series of runs across the main mountain. After trying half a dozen or so trails during the week I decided that my favorite was “The Village Trail”. This trail was a little over 3-miles and was a largely descending single track trail with plenty of speed, trees, and rocks to wake you up first thing in the morning. The best part of morning rides was getting to watch the valley wake up. From the sun sweeping its way across the valley to the mountain flowers, deer, elk, and marmots…everyone was up to see the new day begin. The Village TrailThe Prospect TrailThe second morning of our trip I decided to do a much longer trail (10 miles + several road miles) and that choice proved to be very rewarding but a whole lot more challenging. From the gondola at the top of the main mountain (10,585 feet) the trail rises several hundred additional feet and then cuts across the entire face of the ski area. The first few miles were punctuated with steep and challenging climbs that forced me to push but the downhill sections were spectacular. All along the way I was treated to amazing vistas of mist filled streambeds, lush aspen forests with mossy floors, and views of the high peaks whose upper reaches were still flanked with snow. The second half of the route started after you attained the high point of the ride at 11,000 feet and dropped quickly through several miles of aspen glens and rocky single track. That part of the ride was my favorite and after two days of riding I was really beginning to feel comfortable with the speed on these runs. I didn’t have too much choice about “being comfortable with the speed” since I was unable to break too hard because of tennis elbow issues I have been experiencing on my rear brake hand. The Jurassic, Meadows, River, and Sheridan Trails The last full day of the trip I really wanted to ride as many of the remaining trails as I could. I also wanted to see what the drop off the main mountain was like and so I chose several trails that follow the steep wall that separates Mountain Village from town. I started with a fast paved run down from our condo, through Mountain Village, and lower to the golf course where I picked up the Jurassic Trail. This mile long trail featured some fast riding and some exposed sections in a few spots. Just down from the Jurassic I picked up the next trail which brings you the rest of the way from the ridge top down near where the meadows begin. This trail had a few more steep drops and was a little bit longer than the first. It ended up finishing about a mile up the road from the valley floor where I would pick up the 5-mile long River trail to return back to town. Hanging out in town The town of Telluride is pretty amazing as well. There are lots of restaurants and bars and the typical t-shirt shopping experience. We made a side stop in the thrift store because we had to see what you’d find in such a place in a “fru fru: mountain town. I laughed as I sorted through a variety of $150 biking shoes and other outdoor gear, it was pretty comical. Trip videos
The trailhead at River Bluff
Last week the kids and I enjoyed a busy Mother’s Day with Tracey. As is customary in our household, we try and spend Mothers and Father’s Day doing something together outside. We’ve hiked, fished, gone to the zoo, etc. and this year was no different. Tracey originally thought she wanted to head to Grey Rock, up in the Poudre Canyon, and hike to the summit. But in the end we settled on a bike ride along a new part of the Poudre River Trail that we had never traveled before. The Poudre River Trail is a pretty incredible bike path that stretches 21-miles from central Greeley all the way back to Northwest Fort Collins. Over that distance it carries cyclists along the narrow and winding Poudre River while gently rolling in and out of forests, fields, and occasionally on city streets to connect it all together. Poudre River Trail - East half (Windsor to Greeley)For this trip we decided that we’d begin at a new trailhead near our house called “River Bluffs” and travel East to the “Poudre River Learning Center”, about 12.5 miles away. After running a quick car shuttle and downing a picnic lunch, we were off on our way. Lucas was the least excited about the trip in general, which is typical, but in true Lucas fashion 5-minutes into the trip he was complaining that “Why does mom always have to be right? This trail is awesome, it’s like she knew I’d have a good time!” We hear this a lot from our son, he’s hard to get off the couch but once he is, he loves whatever we’re doing. The new stretch of path was really smooth and fast and had a nice winding downhill section, I think I’ll be bringing my longboard back for some riding soon. As we headed East we went between several old reclaimed gravel pits that have been transformed into wetlands holding all sorts of fish, birds, and other wildlife. In fact, as we reached Frank State Wildlife Area Tracey yelled ahead that it looked like there was a snake across the trail, and sure enough there was. Ahead lay a 8-foot bull snake blocking our way. I quickly jumped off my bike and grabbed my cell phone to take some pictures before it slithered off into the grass. I got a few pictures and we headed on our way. The Poudre Trail is not completely flat and there was a long climb through Frank SWA that again brought a few complaints from Lucas. He is definitely at a distinct disadvantage from the rest of us who have gears on their bike, his little dirt bike is a single speed and his legs were often turning at full tilt just to keep up. We took a few breaks to check out some diversion dams, deer, people fishing, and to play at a park about halfway through the trip. The trail takes a detour for about a mile through the Water Valley subdivision in Windsor before it leaves the city completely behind at the Kodak Wildlife Area. From this point until Greeley the trail feels very distant from the reminders of the city and winds through tall grass, farm fields, by an old military missile silo, and an area where fossilized Sharks Teeth have been found. If you are looking for an enjoyable afternoon ride I’d definitely suggest this stretch as long – as the wind is not blowing.
How many holes does one fisherman need, apparently four. – An ice fishing adventure with Lucas1/27/2013 Several years ago the entire family went for a day of show shoeing in the mountains northwest of Fort Collins. The area is called Red Feather Lakes and it’s both a town and a grouping of maybe 15 or 20 man-made and natural lakes. It’s an absolutely stunning place and is only a short 70-minute drive from our house. The lakes are situated amongst the low hills, evergreen trees, and towering granite rock formations that look like huge mushrooms. On that trip we spent the day exploring the coves around a lake called “Dowdy”, which is a fairly large body of water with lots of formations and islands that rise right out of the water. Mountain views on the way up to Red Feather That day the lake was solid from shore-to-shore and we commented about all of the folks who were sitting out on the ice. Some of them were in red, yellow, or green huts, and others were outside on chairs completely exposed to the cold and wind. You could see determination on their faces, their bodies hunched and energy focused over smallish holes in the ice. You could also imagine each and every one of them just hoping in vain for a lethargic fish to consider biting their small hook covered with Power Bait or stuck with a grub. I thought to myself “These people are crazy, it’s too frickin cold out here to be sitting around on the ice”, or were they? The more we watched the more fish we saw coming out of that lake. In fact there were more fish being taken than I think I’d ever seen come out of a lake at one time. It was then that I realized what they had come for, invisible fish, those fish that without a boat and a good anchor would have been inaccessible by any other tactic. Who hasn’t thought to themselves while fishing “If I could only cast right over there…I’m sure that’s where they are.” But instead the cast comes up 10-yards short because of a breeze or that your boat continually drifts away from the spot you’re trying to hit. These “invisible fish” are the same creatures that you can sometimes even catch a hint of while carefully considering the surface of the water but that are inevitably congregated around large clumps of shoreline bushes. Evil bushes made up of thorns with cosmically charged attracting powers not unlike the Death Star. Their branches act as tractor beams and their natural force is laser focused on your fly, pulling your three dollar feather lined hook into an inescapable bramble. Dad, I think this is a good spot. Well, that’s the brilliance of ice fishing, you can stick a hole in the ice anywhere you want, the weeds are all dormant in the winter and their powers are at bay. And if you don’t find invisible fish where you thought they’d be, just slide your sled full of gear over to the next hole - and your luck just might change. Well that trip up to Red Feather was probably 4-years ago, and the amazing thing was that Lucas still remembers it as if it were yesterday. In fact, he has always wanted to go back there to try ice fishing ever since. This weekend we decided to give it a whirl, both as first timers. What do you need to ice fish? Luck helps but good friends are better. As we figured it, you really didn’t need too much in the way of gear, and in all honestly, you don’t. We already had fishing poles, some small jigs, and plenty of layers to keep us warm. We added a couple lawn chairs, my camp stove to heat water for Ramen noodle and hot coco, and some chips and pop to quench our thirst for when we got tired from catching all those fish. Most of all you need some way to get through the ice and that’s where the friends came in for us. We needed an auger, and for us any auger would do, but I had no idea where to get one. I didn’t really want to buy one because this might be our only ice fishing trip ever – you never know with kids. I looked online and found three main kinds; a hand held version, a version that fits to your electric drill, and then the awesomeness that was a 3-horsepower gas driven ice screw. The ice would melt in the presence of one of those for sure. To buy them outright the cost started at $50 and ran into the hundreds, yikes. We really needed a better plan than to spend that much cash for 4-hours on the ice. I called around town trying to find one to rent but had no luck. Without an auger we could have all the grubs in the world but we weren’t going to get any fish, so I had to “cast a wider net.” I put the word out on Facebook that I was looking to rent or barrow an auger and the magic of social media delivered, again. Thankfully a friend stepped in and let us barrow not only their sweet gas auger but also their sled, cool little ice-specific fishing poles, straps for your feet to keep from losing your step on the ice, and most importantly, as it turned out, they had fresh left over mealworms. We were completely set. Looking out over the ice We arrived at the lake around 9:30 AM and set out for a huge pile of rocks, out in the middle of the lake, I remembered from our last trip. It was about a 300 yard walk from the shore but everything was neatly packed into our sled, so it was sure to be a quick crossing. We got out on the ice and you could tell it was really thick, at least a foot or more near the edge. As we walked across the first bay Lucas and I followed the deep fissures and wet cracks out to where we would begin our day of fishing. We settled on an open area, in probably 20-feet of water, which sat just off those rocks and between two other groups of guys. I pulled out the chairs and gear while Lucas explored the area a bit. With the two other groups of guys looking on, I fiddled with the motor a bit trying to look like I knew what I was doing. Brandon, the augers rightful owner, had told me something about a screw on the gas cap I had to loosen (check), then the choke, I thought I found it (check), then just pull the cord until it fires. Well (check) on the cord pulling part, (no check) on the firing up part. I asked Lucas if he thought maybe it had an on/off switch – he just stared at me. I flipped the motor over and sure enough I found a switch. One more pull on the cord and that thing fired up. As I yanked it vertical it tried to die but I pulled hard on the throttle and the screw began to spin. “Holy shit!” I thought to myself, this thing is sweet. I held on to it pretty tight, I assumed that as soon as I got digging it was going to catch the ice hard and throw me around like some kind of dangerous playground toy. I pushed the point into the ice and let that thing rip. In no time at all we had one hole and then two, and aside from wet boots, we had two perfectly fishable holes. By 10:00 we were actually fishing – this was clearly going to be a good day. The waiting game We got our hooks baited with fake worms and dropped our jigs down the dark holes and into the freezing water. We proceeded to chat about the auger and how cool it was. Lucas wondered when we could make some more holes and I secretly wondered how many I could drill before it ran out of gas…I said in my best dad voice ”Lucas, focus on fishing, we only need more holes if we need them.” I was really hoping we’d need them. So we sat, and sat, and fidgeted, and sat, and frequently discussing what we’d do with the fish we were sure to catch. Lucas wanted me to save them but he had no intention of eating them, he apparently doesn’t like fish. Which at this moment seemed odd to me, then I remembered fishing is less about the fish and more about not having to clean your room. We sat around lazily drinking coco and coffee in the warm sun until we both wanted a snack and to find a bathroom. So we made the 300-yard walk back to shore and grabbed the pretzel bag we had forgotten on the first trip and made a quick stop at the potty. On that third hike back out onto the ice we both decided we were going to make new holes, the old ones were boring. Upon our return to our temporary camp on the ice, I got the water boiling for lunch and fired up the auger again. This time we knew where the fish were, or should be. We had been watching both groups of guys on either side of us pull fish out of their holes about every 5-10 minutes; we’d not even had a bite. We had changed baits, lures, and even did a little complaining about it – nothing seemed to work. So the one thing we noticed about our neighbors was that their holes were about 20-feet closer to the rocks than we were, probably in much shallower water. I pulled the throttle on the auger even harder than I had on the first try and this time confidently put two beautifully drilled holes into the ice. After that was done, I proceeded to move our camp, which took all of a minute to drag everything across the ice, including Lucas who was still seated in his chair – he thought that was pretty funny. Our neighbors looked on anxiously as if we were onto their secret spot. I gave them a “manly nod”, handed my son his hot noodles, and poured a fresh cup of coffee for myself. I reassured Lucas that “these” were the holes that were going to do it for us. I wasn’t so confident inside. I dug through our friend’s bucket of fishing stuff looking for some kind of answer. Hmmm, he had the same jigs, the same poppers, the same Gulp and Power Bait…what’s going to do the trick? Then I saw the little jars of mealworms and wondered if they were still alive, they were. We were on to the secret ingredient that was going to turn our day around. I walked across the 8-feet of ice that separated me from Lucas asked him to pull up his line. I took the fattest mealworm I could find in the package out of the warm shavings and stuck him on the hook. Lucas liked that he had pink guts, I had never noticed that oddity before, and agreed it was pretty cool. He dropped him down the hole and I reiterated my lesson about the jigging motion he was to use to catch the trout. Small up and down pulls that would surely make the fish so hungry and pissed off that they’d swallow our hook for sure. Not 5-minutes later we had our first fish and a few minutes later we had a second. This was getting hot… we were on the fish for sure. I felt like a miner who’d just found a pay streak of gold, Lucas felt the same way and he had a grin going from ear to ear. Things slowed down a bit for a while but then we got two more within 20-minutes. We talked about how cool ice fishing was and how many more fish we might catch before heading home. The funniest thing we discovered was how confused the fish seemed to be when returning them to the water. They’d swim in circles in our little 10-inch hole for a while until, finally, they would dive deep enough to realize they weren’t in an icy fish bowl anymore. It was pretty comical; we even had to push one fish down the hole and back to the lake water because it was clear that it had no idea how to find his way back to freedom. By the end of the day we had pulled in a total of five fish and had thoroughly enjoyed ourselves. We broke camp and headed back across the ice celebrating our prowess as experienced ice fisherman. It’s always so much fun to do something completely new with the kids. We both get to wonder what it will be like beforehand, we get to experience the frustrations together, and the joys of accomplishment. Megan and I have shared this feeling while hunting small game together; I’ll never forget the day we brought home our first rabbits. A shared adventure is definitely a bonding experience and I hope they’ll remember these times as they grow up and make new discoveries of their own. Lucas and I walked off the ice for the last time that day talking about other trips we’d make to the mountains in the coming year. He told me he wants to come back to chase deer, and maybe even shoot a bear. I asked him if he’d ever been close enough to a bear to smell it and he just looked at me. When I explained that bears smell pretty bad he decided we’d just look at them from a distance because mom wouldn’t want my car to smell any worse than it already does. I love these kids.
This week brought no hunting trips but I still had a great new experience to share with Lucas. I decided to take part in a 6-week 3D archery target tournament and the first week was a blast. The series is taking place at Gannett Ridge Hunting Equipment in North Fort Collins on Tuesday and Thursday nights. You can start shooting anytime between 5:30 and 7:00 PM. How it works Each week there are 20 targets positioned along 10 different shooting lanes. Each lane has a short and long shot to make and you’re required to take a variety of positions that simulate real hunting situations. You take shots at a variety of animal targets from the following stances; traditional, toes forward, seated, one and two knee, and even from a ground blind. The blind was a bit interesting and tight quarters with my recurve bow but I managed to hit a bear at 20-yards, in the knee – oops. There are three classes to participate in including compound, women’s, and traditional which is what I am shooting in. Best of all only your top 5 arrows count. I was not sure how I would do in this kind of tournament and I was pleasantly surprised that I only missed three targets out of 20-shots. My main concern was that I just started shooting with a trigger release at Christmas and I am still getting used to it. I occasionally find myself taking the pressure off my bow arm right as I pull the trigger release and that makes the arrow shoot up and nowhere near the target. It’s a bad habit and I’m learning to hold the bow steady why holding more pressure. An archer uses a trigger release because it provides you the ability to pull much harder on the bow string and release it in a consistent manner, arrow after arrow, without the slight variations added by your fingers. I have already found that the release is allowing me to shoot with far more accuracy (see the picture below). Now I just wish that my surgery shoulder agreed with my bow more than it does. I’m shooting a 55-pound PSE Kudu and my release is made by Cobra. Lucas came out with me to see what the event was all about and to help me keep score. He did a great job and was having a blast watching everyone take their shots.
If you’re interested in coming out to participate I think they only require a total of 5 out of 6 nights to be eligible to be officially part of it, but even a night or two makes for great practice. The fee is just $10 a night. They think Tuesdays will be a bit less crowded than Thursdays. About Gannett Ridge Hunting Equipment Gannett Ridge is a local shop owned and operated by Josh Soholt and Tyler Matthews. Josh gave both of our kids a refresher lesson this fall, and along with being a great teacher, he was really helpful in tightening up their form and making the kids feel at home. Best of all, you can drop by the range anytime and do a bit of target practice for free. If you are a backcountry mountain hunter then Gannett Ridge Hunting Equipment is the store designed for you. Gannett Ridge can gear you up head to toe, pack to weapon for your next adventure into the backcounty. Beyond great gear we also have expert mountain hunting advice and a 10 lane archery range. Lessons are $20 a person for a half hour session. super tunes for your compound for $40. Find us in Fort Collins, CO or shop online at http://www.gannettridge.com
I was messing around in the garage this evening because I was feeling a bit stir crazy due to the recent cold snap. It seems like it’s been exceptionally cold recently and most of my toys are made for fairer weather. The local lakes are currently in a deep freeze and it’s just too cold to feel like biking or paddling my skateboard around the neighborhood. I put about 40 arrows into my practice bag but it just wasn’t doing the trick. So the only thing left is to “think spring” and know that the seasonal change will come with lots of things to do in the outdoors. I’ve already started to make some plans for 2013 and I hope to get more on the agenda, but for now these are the things that are sticking out in my mind. Stand Up Paddling In March we’ll be taking the family to Cozumel for Spring Break and we’re planning on bringing the inflatable SUP to try some Caribbean flat water and hopefully some surf along the eastern coast of the island. In the spring and summer I plan on exploring the lower Poudre Canyon, with a bit more water than our fall attempt, and hope to make a trip down to Buena Vista to play in the river park, as well. I know we’ll be taking Megan to camp down in South Fork, so a couple hours in the Salida waterpark should be a possibility as well. Last summer I was lucky enough to take a side trip while on business in South Carolina and spent an afternoon at the US Olympic Whitewater Training facility. If all goes well with some upcoming projects, I’d like to take the SUP along on one of my next trips. The park is absolutely amazing and I’d love to run some of the Class II and Class III whitewater, while attempting to stand on the board of course. Hunting In April, Megan and I are headed back out to try and find turkeys, and for the first time we’ll hunt the spring season. Since turkeys are mating in the spring, we hope to see a bit more activity with birds that have less of an eye on us. We have been at this going on three years now and I am bound and determined to get her on a bird this year. We’re planning on hunting the Centennial Valley SWA but we were told by a DOW officer to hang back until the third weekend because the birds get spooked with so many hunters in the woods. I think we’ll try opening weekend up above Dadds Gulch above the Poudre Canyon. I’m also planning on putting in for a fall deer tag and am trying to decide whether to go during archery or rifle seasons. My left shoulder, the one I had surgery on almost two-years ago, has been recently been giving me some trouble because of my recurve bow, so I may try a compound this season I go archery. There’s still a lot of other stuff to get done throughout the warmer season but we’ll find a way to get in some hiking, biking, kiting, canoeing, climbing, sail boating, shooting, boomeranging, skateboarding, and all of the other stuff that fills in the blank space outside of work.
We were so excited to have a nice Bluebird day to go skiing as a family today. We hadn't gone last year due to crappy snow and my toe surgery. We spent the day at Eldora Mountain Resort outside of Nederland, CO. Megan was a little bummed that there were no black diamond runs open and Lucas continues to improve his confidence and was skiing a lot of blue terrain. He even road the lift and skied a whole bunch of runs by himself after we all called it a day. Its fun to see the kids progress.
|
AuthorRob Bean is an everyday adventurer who is based in Fort Collins, Colorado. He enjoys all manner of outside activities from canoeing, to kiting, and hunting. Archives
May 2014
Categories
All
|